Sunday, February 15, 2009

RAINY SATURDAY PROJECT


My favorite weekend sport is cruising for yard sales, and since I live in Southern California the opportunities are pretty much year round. (Except when it rains on Saturday morning!) I never used to look for clothing, figuring I wouldn’t find anything in my size. How wrong I was—once I started to keep an eye out for things to wear I was amazed at what I found. And the prices…ooh la la! Drop in at my blog sometime to check out my weekly finds (and the stories that go with them!).

I feel so fortunate to have all this thrifting treasure available here. But like many thrifters, I've been known to bring home great deals that weren’t so great because I never used the item. One of my goals this year is not to let that happen. So when it rained a couple of Saturdays ago, I used my normal garaging time to remodel this skirt and blouse I picked up last summer for a buck and a half.

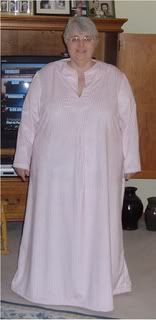
They’re by Ulla Popken, and judging from her website would have been about $70 each retail. Rayon with embroidery and some tasteful sequins. The tag said dry clean.

I don’t dry clean.

I don’t like the smell of the chemicals, don’t think they’re healthy to be around, and I don’t like the cost. My frugal self can't quite see buying something for a dollar or two and then spending over and over to dry clean it. So any yard sale clothing that says dry clean, I hand wash. Almost never has this backfired, and the item or two that shrank just got donated. They weren’t ruined, just smaller!

The top on this set shrank selectively. After I hand washed and dried it on the line, it was a little snug, especially the sleeves. Heck, I thought, but then I started considering the skirt. I have short legs, so lots of skirts hit the tops of my shoes if I don’t shorten them or hike them up under my armpits. This skirt was quite long, and has a ruffled tier on the bottom—not a candidate for shortening at the hem. However, skirts can easily be shortened from the top.

I picked open the elastic waist on the skirt, cut off about 5”, sewed a new casing, reinserted elastic and voila, the skirt was a length I like. Then I picked open the side and underarm seams on the top and inserted the cut-off skirt material. I admit picking out seams is boring, but I did it while watching a movie so it didn’t drive me mad. Since the fabric is black, I fancy the addition is barely noticeable. And if anyone ever comments on it I'll just say yes, I did add in some fabric, aren’t you clever to have noticed.


So now I have this comfy and (I think) spiffy dress to wear.

Since I had a few scraps of the black fabric left, I was able to repair a bleach spot on the sleeve of another (twenty five cent!) We Be Bop shirt.


I appliquéd a small heart over it. Yes, wearing my heart on my sleeve, as the saying goes. I’m easily amused.

I used the same shorten-from-the-top technique a while back on this Jones New York silk skirt.

It was a couple of sizes too small, but cut on the bias and very long. This one has a set-on waistband, which I removed. Cut off a few inches at the top, put the waistband back on, inserted elastic, and now it’s my size and length. Which made me very happy, since I paid a whole dollar for this one!

Sunday, February 8, 2009

on the diagonal


green linen top, originally uploaded by Soozs.

I started this top a while ago. I was super excited about the fabric - a loose pure linen knit - and set out full of hope.

But the cowl neck just didn't work and the front was all floppy and shapeless. I was inspired by the front pleat and tuck work a few people had been doing (see here and here), but it just didn't look right. The strong vertical centre line worked like a big arrow pointing to my belly. Ahem.

A friend helped me with this version, invoking the classic, can't go wrong shape for big chicks (especially those of us with an ample bosom) the diagonal.

Pretty much every top I have ever owned with a strong diagonal line between the bust makes me look good. It gets rid of the uniboob problem and draws your eye somewhere off centre.

So I'm very happy with this.

I've been asked for pattern, but there isn't one. I've written up a few details about how I made it over on flickr, so go look there if you are interested. Happy to answer questions!

*edited to add - yes, the fabric is fantastic. I bought it locally at cutting edge here in Melbourne, which is a great source of unusual quality fabrics. I have never seen a linen knit before or since and I would be more than happy to hear from anyone who sees more of it! It wasn't cheap (cool unusual stuff rarely is) at $28 a meter, but the top took 1.5 m, so that's $42. And I think that when I have clothes made from really good fabric, it lasts and even more importantly, people are always looking and commenting on the fabric, not me.

Monday, February 2, 2009

Recommended Pattern: McCalls 5768

The past two weekends I've made two very comfortable loungers from a current McCalls pattern that I recommend to those of you who are LARGE. It is available in sizes 18 to 32 (US). The drawing and photo of the pattern envelope, below, are from the McCalls website.


It is designated as a top, tunic and caftan. I am going to make a top out of this, as I found the lounger design so comfortable. I used a Minky like knit for both of the garments shown below. I made a few changes: I added an inch and a half to the top edge of the yokes to help with "warmth"; instead of a separate sleeve band, I joined it together for a single piece sleeve; instead of the side slits, I sewed the entire side closed. In the second garment, I raised the bottom of the front yoke slit by two inches. I did not make any other pattern adjustments - no FBA. I completed a Pattern Review, which you may want to consult if you consider sewing this pattern.

The result of these changes are two nice warm comfortable garments for our cold cold winter here in Ohio.

The Unvarnished Truth


Gulp, the title of this post is quite accurate. I am sharing with you the water tape double form I made in September. Of course, this means that you know exactly the proportions of your body, no hiding now - I now know how big my rear is!

I took a class at the American Sewing & Craft Expo in Novi, Michigan last September that supported you in creating one of these forms. It was actually a fun class, and I was partnered with two funny ladies from Michigan to each complete these forms.

The leader of the class was Jan Bones, who has led many many such classes. If you click on her name, you will go to the website. On the left hand column, the third title is "DRESS FORM INFORMATION". This provides views of other dress forms and info on purchasing Jan's instructions for making this form. Jan also designs the Lingerie Secrets line of patterns.

You need to purchase some gummed tape. I found this on an art supply website, so you should be able to find it where ever you are.
Gummed Paper Tape
2"x75' gummed paper tape. Brown "craft" color; moisten with water. Easy to cut with scissors or craft knife.
EDIT: 2/8/09 - the website states you need three of these rolls of tape.
Briefly, you need at least one person to assist you - two is better. You cut the roll of water tape into reasonable lengths, preferably several that will go around your hips and waist. You don a piece of plastic (from a dry cleaners) and start with a round or two of the tape at the waist. This sort of anchors the process. Just like the duct tape form, you the proceed to cover the entire neck to upper thigh area, building up two or three layers of the tape. Don't soak the tape - put some water in a flat pan, and a sponge in the water. You can then slide the tape across the sponge to wet it. Edit 2/8/09: Once it is covered as much as you think worthy, you can use hair dryers to blow dry some of the wetter areas.

When you have a good shell that is mostly dry, you must cut in as straight a line as possible down the back of slip the shell off of your body. Before you do that, make a line across the cutting area in several spaces, so you can match it. You should staple it together along about 2 inches at the top and bottom, and a few tape areas across the body that will hold that shell together. You then hang it upside down (important) from a couple of ribbons pinned to the form, so it will dry.

Once you are done, and it has dried, you can then cut smaller pieces of tape and close that seam at the back. You should also use smaller pieces to reinforce the arm holes, bottom and neck (I elected to "fill in" the neck). Jan said you can put it on a hanger and use it as a form in this way, put it on a pole, etc.

She also suggests covering the brown paper - paint, decoupage, a knitted cover, etc. I haven't gotten that far with mine as yet.

A few more points: this is sturdier than the duct tape, you don't have to "stuff" it, and it will hold its shape quite well. Jan said that because it was created on top of your body, it accounts for some of the ease that you would normally include in a garment. So you should consider that when using the form.

Sally's Introduction

Hello All Large Ladies and Gentlemen!

Sue was kind enough to add me to the contributors to this blog. I have sewn since I was a teen, and I explore issues of fit and style for the larger woman with great frequency.
I am very interested in the issues that Large explores - I've been up and down (oh gosh, haven't we all??), but at am my current highest weight, and, naturally, size.

I have a blog SallySews, that I invite you to visit at your leisure. It details all my sewing (clothing, bags and quilts), as well as other items I am interested in that are craft/sewing related. I am in Ohio, U.S.A.

I am in the midst of enlarging some patterns from smaller to larger, and promise to record this process so that I can detail and offer some suggestions to you. I also have a gummed tape body double that is supposed to be more sturdy than a duct tape double. I will get a photo of it and describe it for you later today. I took a class from a woman last September that guided the creation of this double, but the process is not difficult.
Here is a photo of me in my favorite project of 2008. It is the Xceptional Shirt, from a pattern from Dana Marie Designs (formerly Pawprints). Her patterns include sizes from small to 5x, so finding a good fit becomes easy with a bit of familiarity.

I am glad to be here and hope we can discuss our projects and the issues we all encounter here!

Sunday, February 1, 2009

duct tape dress form


I've just done a post over on my blog about making a dress form out of duct tape (read it here.)

There's a few things I thought I'd add about it here specifically as a larger size issue.

I absolutely love the idea of having a dress form. I think one of the things that really lets plus size clothes down is poor fit and for getting this right, shape is absolutely critical. And of course, buying a plus size dress form is virtually impossible.

Making my own, as I detailed on the blog, was a trying experience and I am sure a significant part of this was a size issue. The relative strength and structure of the form just isn't as suitable to a larger size, and when you upsize everything in the process, it all takes longer and has more room for error. I think too, bigger often means more wobbly, so it is really hard to acurately capture your size and shape - too tight distorts, too lose makes it too big.

But if I can I think I'll give it another go. I'll get LOADS of tape and do at least 4 layers I think (maybe more in some bits), and make sure it comes right down over my butt.

I'd love to hear anything else from anyone about dress forms - duct tape or otherwise. Maybe we could organise a duct tape party and get a thing going...